
Learn how to create an interactive button to change status for a project/item in SharePoint
The challenge
If you have a list item (it could be a project) you probably have some stages for the specific project.
Having a standard choice field might help you to control the stages, but the user first have to open the info panel, and there is a risk that they don’t know or select the wrong, next stage
If the stages are not dynamic, we can use JSON formatting to create a button, that changes the status for the user
The solution
Step 1
Create a new choice column (not multi choice)
Note that the first name you give the column will be the internal name which we need for the json code.
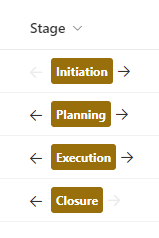
I have created a new column with the name Stage and the following choices
- Initiation
- Planning
- Execution
- Closure
Step 2
If you have made the exact same column, with the same choices as me, you can copy-paste the below code.
If not, copy it into Visual Studio Code and make the nessesary changes as descriped in step 3
The JSON code
{
  "$schema": "https://developer.microsoft.com/json-schemas/sp/v2/column-formatting.schema.json",
  "elmType": "div",
  "style": {
    "display": "=if(@currentField == '', 'none', 'flex')"
  },
  "children": [
    {
      "elmType": "div",
      "attributes": {
        "iconName": "ChromeBack",
        "class": "=if(@currentField != 'Initiation','ms-fontColor-neutralPrimary ms-fontColor-themePrimary--hover', 'ms-fontColor-neutralLight')"
      },
      "style": {
        "cursor": "pointer",
        "padding-right": "4px",
        "padding-top": "4px"
      },
      "customRowAction": {
        "action": "setValue",
        "actionInput": {
          "Stage": "=if(@currentField == 'Closure', 'Execution', if(@currentField == 'Execution', 'Planning', if(@currentField == 'Planning', 'Initiation', @currentField)))"
        }
      }
    },
    {
      "elmType": "div",
      "children": [
        {
          "elmType": "div",
          "style": {
            "flex-direction": "row",
            "display": "flex"
          },
          "children": [
            {
              "elmType": "div",
              "style": {
                "width": "100%",
                "height": "26px",
                "border-radius": "3px",
                "align-items": "center",
                "justify-content": "space-evenly",
                "margin": "5px"
              },
              "attributes": {
                "class": "ms-bgColor-themePrimary ms-bgColor-themeDarker--hover ms-fontColor-white ms-fontSize-12 ms-fontWeight-bold"
              },
              "children": [
                {
                  "elmType": "div",
                  "style": {
                    "margin": "5px"
                  },
                  "txtContent": "@currentField"
                }
              ]
            }
          ]
        }
      ]
    },
    {
      "elmType": "div",
      "children": [
        {
          "elmType": "div",
          "attributes": {
            "iconName": "ChromeBackMirrored",
            "class": "=if(@currentField != 'Closure','ms-fontColor-neutralPrimary ms-fontColor-themePrimary--hover', 'ms-fontColor-neutralLight')"
          },
          "style": {
            "cursor": "pointer",
            "padding-right": "4px",
            "padding-top": "4px"
          },
          "customRowAction": {
            "action": "setValue",
            "actionInput": {
              "Stage": "=if(@currentField == 'Initiation', 'Planning', if(@currentField == 'Planning', 'Execution', if(@currentField == 'Execution', 'Closure', @currentField)))"
            }
          }
        }
      ]
    }
  ]
}
Step 3
To make the code work for your own column, and with your own choices do the following changes
Change 1
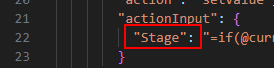
Line 22 and 80
Change Stage the the internal name of your column
Change 2
Line 12 change the word Initiation to the first choice/step in your stage

Change 3
Line 70 change the word Closure to the last choice/step in your stage

Change 4
Line 22 is your stage backwards so if the current stage is Closure then change to Execution, if Execution change to Planning and so on…"Stage": "=if(@currentField == 'Closure', 'Execution', if(@currentField == 'Execution', 'Planning', if(@currentField == 'Planning', 'Initiation', @currentField)))"
Change 5
Line 80 is your stage the other way around. Again if the current stage is Initiation change to Planning, if current stage is Planning change to Execution and so on…"Stage": "=if(@currentField == 'Initiation', 'Planning', if(@currentField == 'Planning', 'Execution', if(@currentField == 'Execution', 'Closure', @currentField)))"
We now have more control of the stages, and the user can now quickly change status by clicking the arrow.
